styrene

Building an ankle wedge

Something I’ve realized over the past year where I’ve been building my R2, is that I really love scratch building things from styrene.

Styrene is very forgiving, and once you’ve learned how, making things is actually quite easy!

Today’ I set out to build a small silly piece with lots of weird angles and stuff: An ankle Wedge! (Actually I built two of them, but who’s couting… I need 4 in total, so halfway there… unless I cave in and use the two resin ones that I do have laying around…)

Anyway, back on track! The ankle wedge is a small piece that is sitting on the bottom of the legs, holding the Ankle Cylinder.

I’ve previously built my ankle cylinders out of PVC pipe and styrene, and even though they still need a bit of work, they sit good enough on my robot in order to me to make the wedges!

These are the main pieces. A big piece of styrene, with no straight angles. The short edge will be closest to the ankle, and the big end will rest on the cylinder. The sides are made up by small triangular pieces. I’ve cut out larger triangles, measure, then place a piece of extra pipe on top my 1mm styrene piece and cut around it (had to cut a few times to get the proper fit) to get the right curve.

This is really a try/test/try/test again sort of procedure in order to get these to sit snug, but after a few test tries, I did get my triangular piece to sit pretty spot on to the cylinder.

Once the triangular pieces are made (be sure to mark them properly so you know which side is which, what is in, what is out, etc) I chamfered the long edge of the flat styrene piece, to make it look good on the cylinder. Then glue time!

Two pieces of tape to hold the triangles to the large piece of styrene, and then just glue it all down!
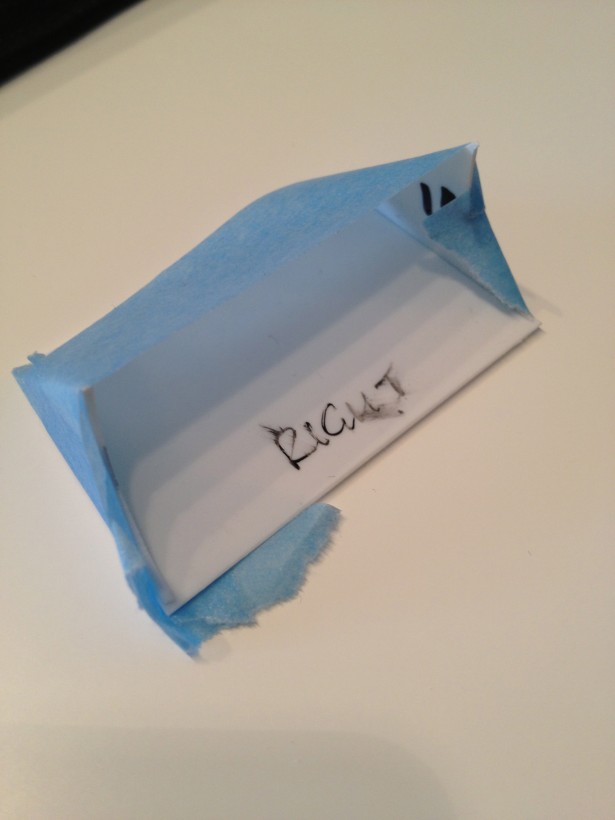
Once the glue set, I added another piece in the center, just for stability.

Then time to use my secret instrument to make it fit really well…

No, not THAT kind of instrument. It’s not a plastic didgeridoo!

However, the PVC pipe with a piece of sand paper strapped on to it, makes for a perfect tool to sand the little wedge to remove any irregularities after glueing it all together!

Finally, let’s end this brief tutorial with taking a look at the results!

Nice and smooth! Now I just need to paint them blue and set aside as finished!

Oh yeah.. need to make another two… unless I use them old resin ones.. I kinda like these better, and they fit SO much nicer…
By |2016-12-06T00:01:09+01:00October 11th, 2012|R2-D2|Comments Off on Building an ankle wedge

He’s making a list and checking it twice..

Well.. checking it all the time, it seems.

I am of course talking about my R2-2DO list as I call it.

The list. The list of things that needs to be fixed for my droid to be considered complete, and I’m no longer building, but merely upgrading!

I do mix up things, from making things that are actually on the list, to finding things that are not, to things that I really should postpone to a much much later date, such as work for my secondary dome!

Anyway, I have done some progress, even though it is pretty small progress at that, since I don’t have that much time to build at the moment.

First off, I’ve received a couple of packages with cool things lately.

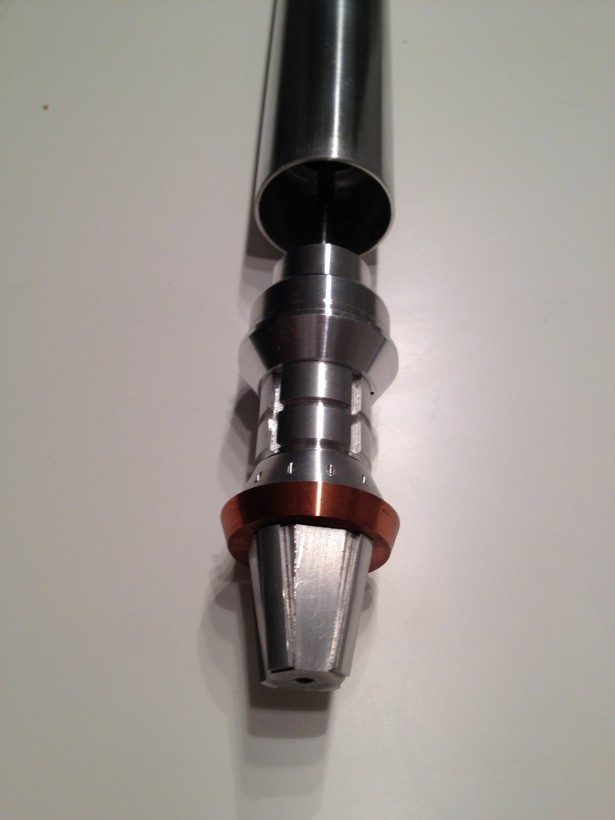
This is the aluminum data interface that you see R2 using all the time in the movies. Man, this thing is heavy! I wonder if I can actually use it in my styrene build, or if I will need to sell it to an all-aluminium junkie…

Some cables and random things for my forthcoming droid controller.. I have plenty of things that has arrived for this one, and orders for PCB’s and electronics on the way. Jameco wanted me to upgrade the shipping to an option that cost twice the value of the components inside. They claimed it would take 6-8 weeks for this to arrive. It took less than one week =) I’m glad I refused to upgrade! =)

Today, these goodies arrived! It is the battery harnesses from Guy that has arrived! I can now finally complete the battery boxes… if they were painted, that is.

I’ve had more things come in, but nothing major, yet. I will update with a few big posts about that droid controller later on!

I have actually done some work as well.. I’ve taken off all the blue panels from the head, and they are waiting for me to sand them here before I finally paint them in the proper color. The pie panels are still on the dome, however.

This box is where I keep the goodies. You can see a rubber PSI housing for my secondary dome, the paper tube that contains the data interface, some cables, both my horseshoes and other things that have been removed from the body for now.

This is interesting. While cleaning yesterday, I somehow found it appropriate to all of a sudden, out of the blue, drill holes into my secondary dome. I guess it comes down to me cleaning, found my hole saws and figured… why not =)

These have only been rough cut out of the dome. I will need to file to perfection later on. Man, sawing fibre glass really does create a LOT of dust!

So, that’s one thing off the list, but I figured I would need to do one more thing. This is really the last thing needed for the body before it is down to sanding the body down, prime it and apply bondo!

I’ve fixed my long doors for the front. When I originally made these, I just glued them in place with my melt glue gun, thinking that I’d fix this later. Well.. it is later. I pried them loose, I’ve removed the thick ribs on the back, made new, tiny ribs, sanded the back down to get all the ribs to the right size, added a back plate and glued it all together.

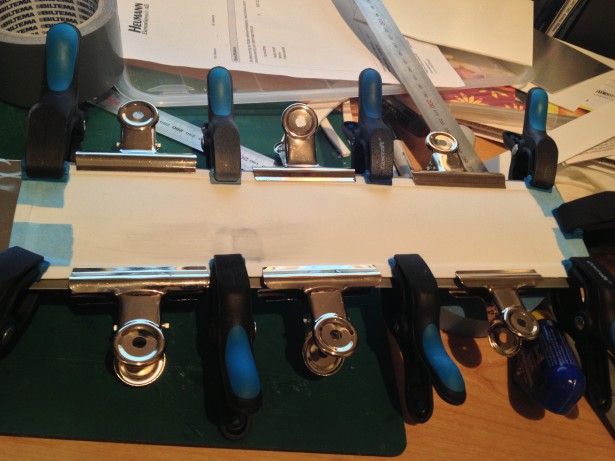
I’ve clamped both my doors back to back with a piece of 0.8mm aluminium in the middle in order to get them to set with the correct curve.

Well, that’s about it!

It felt good to do some styrene work again for a change. Score and snap, that’s just nice and easy!

The last thing I need to do, is to fix up my last battery box and do a bit of TLC on the body and skin, and it’s all going to be painted!

Speaking of paint, I can also mention that I’ve decided upon the main white colour, found a supplier in Sweden and placed an order for 5 cans of satin pearl white with 4 cans of primer!

Woohoo!

By |2016-12-06T00:01:15+01:00October 2nd, 2012|R2-D2|Comments Off on He’s making a list and checking it twice..

Eradicating Irregularities

More and more small things are crossed off my list.. and many more things that I find along the way that never was on the list to begin with, but should probably have been there…

While preparing the body for painting, I decided to fix another small thing that had bothered me a bit. It seems that my frame was not 100% straight at the top, making a slightly larger gap between the dome ring and the frame right where the shoulders attach. The gap here was about 3mm, while it was 1mm around the rest of the body.

So, setting out to fix it, I started with adding a smaller strip of styrene around the top of the frame, outside the rockler, but quickly scrapped the idea, fortunately before the glue had set permanently!

Instead, I reinforced the top frame ring with 2mm styrene around the shoulders!

2 pieces of styrene added, time to trim it flush and mark where to sand..

This was done on both sides, and I spent a good 45 minutes outside with my detail sander smoothing these out, but once I was done, it looked great and smooth. I test fitted with the rockler, found 2 more areas where a little more was needed to take off, once the rockler was sitting flush all around (which it wasn’t before, let me tell you) I mounted it again and put the dome on top.

The gap is now nice and flush. You can still see the old gap in the gray area above.. I’ve got a 1.5 mm gap all around the dome! I may remove a bolt inside and use washers instead to make this gap even smaller, I haven’t decided yet.

When I was working with the rockler, I also removed a few of the acetal bearings inside to make it run smoother. I also gave it a good sprayng of teflon spray while at it.

Now, I’ve removed the Pittman dome motor while sanding, but without the motor, this is how freely the dome now spins…

I feel quite happy with this change, and without the gap, it feels even better!

I celebrated the new spinning dome by getting another item dome on my list: I fixed and finalized one of the battery boxes! bondoed, sanded, everything!

By |2016-12-06T00:01:15+01:00September 30th, 2012|R2-D2|Comments Off on Eradicating Irregularities
Go to Top